
What is a CAD Unit?
CAD Units are a way that your department can set up a user or multiple users to be dispatched to calls. There are many ways that you can customize a CAD Unit and use those customizations to make quick and informed decisions on which unit(s) to send on a specific call. For instance, most departments have their units set up to have one officer/user per CAD Unit, and you can add a CAD Unit Type to that unit for filtering by that type or add a default vehicle if that unit always uses the same vehicle. You can also set up a CAD Unit to have multiple officers/users if that group will always be traveling together or set up a blank CAD Unit to where you can change the officer/user assigned to it during each login if you want to have a CAD Unit that may be a different officer/user every time.

How Can I Customize My CAD Units?
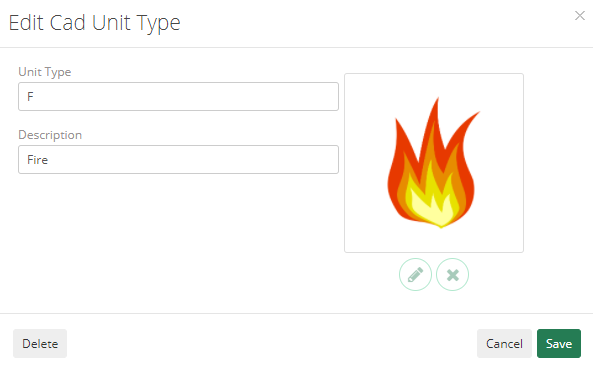
There are two sections you can use to set up a CAD Unit through the ARMS Setup Menu, which are the CAD Unit Type section and the CAD Unit section. The CAD Unit Type section is where you can set up different types of CAD Units that you might want to filter by and include an icon for that type that will show up next to the CAD Unit in the “Available Units List” section of the CAD Screen. The CAD Unit section is where you can enter the unit’s name and description, choose what CAD Unit type it is and department if you would like to track that as well. In this section you can also choose what employee(s) you would like to associate to the CAD unit and a default vehicle.
Through the CAD screen, you can log on your unit by going to “Functions”, then “Log On/Off Units”, and either “Log On Units” or “CAD Unit Maintenance”. The “Log On Units” choice is a quick way to add the unit while choosing a Site that you can later filter by as well. The “CAD Unit Maintenance” choice will allow you to manipulate the officers/users in a CAD Unit, so if you went with the blank CAD Unit options, this would be how you can choose the associated user(s) during the login process.
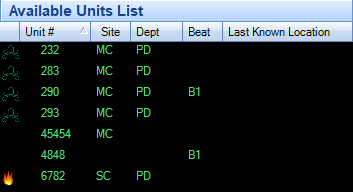
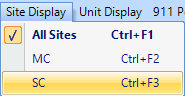
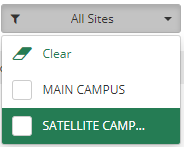
After logging in your CAD Units, you should now see in the “Available Units List” section your units, an icon showing their CAD Unit Type, and the codes for their Site and Department. Logging a unit on to a specific site or setting that unit up with a CAD Unit Type now allows you to filter your CAD screen by those fields. To do this, you can click on “Site Display” or “Unit Display” at the top of the screen and choose one or multiple that you would like to filter by. This will filter what shows up only on your specific screen and will affect the “Available Units List”, “Open Calls List”, and “Next” and “Previous” buttons to only show information related to your selected Sites or CAD Unit Types.
Why Should I Customize My CAD Units?
The CAD Unit features was made to allow departments to quickly login their officers/users and customize them to how each department would use them. The ability to add a CAD Unit Type to each of them gives the dispatcher the opportunity to quickly find the specific CAD Unit they need for a call by using either the icon on the “Available Units List” or the “Unit Display” filtering. Similarly, the “Site Display” filtering does that as well, but also allows larger agencies to split the load of CAD calls between their different locations. We recommend all customers use these features to utilize ARMS for how it works for you and ensure everyone is able to complete their job effortlessly and efficiently.